Before you create a site, you need to determine whether you want a subsite within the existing site structure or a new top-level site. This article provides basic information to help you decide. If you need additional guidance, or if you need to create several subsites or top-level sites, consider consulting with your administrator.
In this article
 Overview
Decide whether to create a subsite or a top-level site
Create a subsite under the existing site
Create a top-level site by using self-service site creation
Other ways to create sites
Overview
A site is a group of related Web pages where your team can work on projects, conduct meetings, and share information. Your organization can use subsites (subsite: A complete Web site stored in a named subdirectory of the top-level Web site. Each subsite can have administration, authoring, and browsing permissions that are independent from the top-level Web site and other subsites.) and top-level sites (top-level site: A Web site at the top of the hierarchy in a site collection, from which you can manage site collection features. A top-level site can have multiple subsites.) to divide site content into distinct, separately manageable sites. For example, your organization may want separate sites for each product or region.
Top-level Web sites can have multiple subsites, and subsites in turn can have multiple subsites. The entire structure of a top-level Web site and all of its subsites is called a site collection (site collection: A set of Web sites on a virtual server that have the same owner and share administration settings. Each site collection contains a top-level Web site and can contain one or more subsites.).
Whether you can create sites and subsites depends on how your organization has set up its sites and its permissions to create them. Some organizations need to maintain tight control over who can create sites, or when and where sites are created. Other organizations allow users more access and freedom to create sites when needed.
Subsite
You can create a new subsite within the existing site structure if you have the Design permission level. By default, a new subsite uses the URL of its parent site as the first part of its URL. A subsite can inherit the permissions and navigation of the existing site, but you can also specify unique permissions and navigation. For example, a new subsite uses the existing top link bar and home page by default, but you can specify that it uses its own top link bar and home page.

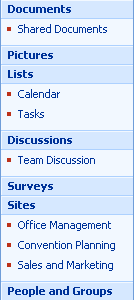
The top link bar appears as one or more hyperlinked tabs across the top of all pages. For example, if your site is named Convention Planning, links to your Convention Planning site can appear in the top link bar of the parent site, so that people who visit the parent site can easily find your Convention Planning site.
When you create a new subsite, you can include the subsite in navigational elements of the parent site to help people find your site. For example, you can include the subsite in the top link bar of the parent site and on the Quick Launch of the parent site. The Quick Launch is displayed on the side of most user-facing pages directly below the View All Site Content link.
Top-level site
By default, you must be an administrator to create top-level sites (and the site collections based on top-level sites), but your administrator can enable self-service site creation to enable other people to create top-level sites. If self-service site creation is enabled, people with the Full Control, Design, Contribute, and Read permission levels can create sites. A top-level site cannot inherit navigation or permissions from another site.
It provides its own navigational elements and permissions, but you can modify the permissions. When you create a new top-level site, links to it are not automatically added to another site.
You can edit the navigational elements of other sites later so that they point to your site.
Note
By default, new top-level sites and their site collections are created in a sites directory that is based on the server path. For example, the URL for a site called Site_A would be: http://server_name/sites/Site_A/default.aspx. By default, the path name is called /sites, although the name can vary depending on the language of the site. An administrator can change the name or location of this path by defining managed paths. When you create a site by using self-service site creation, however, you cannot change the sites path.
 Top of Page
Decide whether to a create subsite or a top-level site
You must decide whether to create subsites within the same site collection or top-level Web sites in separate site collections. This decision is based on how much the sites have in common with each other, whether you want to be able to manage them individually, and whether you want them to share elements, such as navigation or search.
Within a site collection, all sites can use the same:
- Navigation
- Content types
- Workflows
- Security groups
- Lookup fields across lists
- Search scope
- Feature set
Choose subsites within the same site collection when you:
- Want to share navigation between sites.
- Want to have subsites inherit permissions from parent sites.
- Want to share lists between sites.
- Want to share design elements (such as themes or styles) between sites.
Choose top-level Web sites in separate site collections when you:
- Need separate security for different sites.
Note
Although you can have unique permissions for a subsite, at times you may want to be sure that there are no users and permissions in common between two sites. In those cases, you should use separate site collections.
- May need to move the site collection to a different database in the future.
- Want to be able to back
up or restore just that site.
- Want to be able to limit the scope of a workflow to just that site.
- Want to have a separate search scope for just that site.
Top of PageCreate a subsite under the existing site
Before creating a site, make sure that you are at the location on your site where you want to create a new subsite.
- Click View All Site Content, and then click Create on the All Site Content page.
Tip In most cases, you can use the Site Actions menu  instead to complete this step.
- Under Web Pages, click Sites and Workspaces.
- In the Title and Description section, type a title for your site. The title is required.
The title appears at the top of the Web page and appears in navigational elements that help users to find and open the site.
- Type a description of the purpose of your site in the Description box. The description is optional.
The description appears at the top of the Web page and helps users understand the purpose of your site.
- In the Web Site Address section, type a URL for your site. The first part is provided for you.
To avoid potential problems with updating or modifying the site, do not enter any of the following special characters as part of the Web address.
| Special characters to avoid |
|---|
| / |
| \\ |
| : |
| * |
| ? |
| " |
| < |
| > |
| | |
| # |
| \t |
| { |
| } |
| % |
- In the
Template Selection section, click the tab that you want, and then select the site template that you want.
- Team site Select this site template when you want to create a site that teams can use to create, organize, and share information. The template includes a document library and basic lists such as Announcements, Calendar, Contacts, and Links.
- Blank site Select this site template when you want to create a site with a blank home page that you plan to customize. You can use a Web design program that is compatible with Windows SharePoint Services, such as Microsoft Office SharePoint Designer 2007, to add interactive lists or any other features.
- Document Workspace site Select this site template when you want to create a site that helps your team members to work together on documents. This template provides a document library for storing the primary document and supporting files, a Tasks list for assigning to-do items, and a Links list for resources related to the document.
- Wiki site Select this site template when you want to create a site where users can quickly and easily add, edit, and link Web pages.
- Blog site Select this site template when you want to create a site where users can post information and allow others to comment on it.
- Basic Meeting Workspace site Select this site template when you want to create a site that helps you to plan, organize, and track your meeting with the rest of your team. The template includes following lists: Objectives, Attendees, Agenda, and Document Library.
- Blank Meeting Workspace site Select this site template when you want to create a blank Meeting Workspace site that you can customize, based on your requirements.
- Decision Meeting Workspace site Select this site template when you want to create a site that is ideal for reviewing documents and recording any decisions that are reached at the meeting. The template includes the following lists: Objectives, Attendees, Agenda, Document Library, Tasks, and Decisions.
- Social Meeting Workspace site Select this site template when you want to create a site that helps you to plan and coordinate social occasions. The template includes the following lists: Attendees, Directions, Things To Bring, Discussions, and Picture Library.
- Multipage Meeting Workspace site Select this site template when you want to create a site that provides all the basics to plan, organize, and track your meeting with multiple pages. The template contains the following lists: Objectives, Attendees, and Agenda in addition to two blank pages for you to customize based on your requirements.
- In the Permissions section, select whether you want to provide access to the same users who have access to this parent site or to a unique set of users.
If you click Use Unique Permissions, you can set up permissions later after you finish entering information on the current page.
- In the Navigation section, select whether you want the new subsite to be visible in the navigation of its parent site.
By default, the Quick Launch is displayed on the side of most user-facing pages directly below the View All Site Content link. The top link bar appears as one or more hyperlinked tabs across the top of all pages.
- In the Navigation Inheritance section, specify whether you want the site to inherit its top link bar from the parent site or to have its own set of links on the top link bar.
This setting also affects whether the new site appears as part of the breadcrumb navigation of the parent site. The breadcrumb navigation provides a set of hyperlinks that enable site users to quickly navigate up the hierarchy of sites within a site collection, such as Convention Planning. When you navigate down the site hierarchy, breadcrumb navigation appears on the page to which you have navigated. If you click No, your subsite will not contain the breadcrumb navigation of the parent site.
- Click Create.
If you specified that you want the the subsite to have the same permission as its parent site, the new site is created when you click Create. If you specified unique permissions, the Set Up Groups for this Site page appears, where you can set up groups for the subsite.
- If the Set Up Groups for this Site page appears, you need to specify whether you want to create new groups or use existing groups for visitors, members, and owners of this site. In each section, do one of the following:
- If you click Create a new group, either accept the automatically created name for the new SharePoint group, or type a new name, and then add the people whom you want. Click the check mark icon to verify any names that you type, or click the Address Book icon to browse through your directory for more names.
In the Visitors to this Site section, you can also add all authenticated users to the Visitors group, which provides the group members with permission to read the content on your site, by default.
- If you click Use an existing group, select the SharePoint group that you want from the list.
If you have several SharePoint groups, the list may be abbreviated. Click More to see the full list or Less
to abbreviate the list.
- Click OK.
Top of PageCreate a top-level site by using self-service site creation
Before you can create a site by using self-service site creation, an administrator must first enable Self-Service Site Creation in SharePoint Central Administration.
If self-service site creation is enabled, an announcement with a link for creating a site appears in the Announcements list on the site. If you do not see the announcement, see your administrator for information about the self-service URL for creating sites.
- Go to the top-level site in the site collection.
If you are in a subsite of the top-level site, click the home page in the top link bar or the first site in the hierarchy of the breadcrumb navigation. For example, if your breadcrumb is Team Site>Marketing>Projects, because you are on the Projects page for the Marketing site page, click Team Site.
- On the home page of the top-level site, look at the Announcements list.
If you don't see an announcement for self-service site creation on the home page, display the full list by clicking Announcements. If you do not see the Announcements list, click View All Site Content, and then look for Announcements under Lists.
Tip If you already have a URL for self-service site creation, you can type or paste the URL directly into the Address bar of your browser without first locating the site-creation announcement.
- In the announcement titled Self-Service Site Creation, click the URL for creating a new Web site. If you do not see the URL, click the announcement to open it fully.
By default, the announcement is called Self-Service Site Creation, but your administrator may have customized it.
- On the New SharePoint Site page, in the Title and Description section, type a title for your site. The title is required.
The title appears at the top of the Web page and appears in navigational elements that help users to find and open the site.
- In the Title and Description section, type a description of the purpose of your site in the Description box. The description is optional.
The description appears at the top of the Web page and helps users to understand the purpose of your site.
- In the Web Site Address section, type a URL for your site. The first part is provided for you.
To avoid potential problems with updating or modifying the site, do not enter any of the following special characters as part of the Web address.
| Special characters to avoid |
|---|
| / |
| \\ |
| : |
| * |
| ? |
| " |
| < |
| < |
| | |
| # |
| \t |
| { |
| } |
| % |
- In the
Template Selection section, click the tab that you want, and then select the site template that you want.
- Team site Select this site template when you want to create a site that teams can use to create, organize, and share information. The template includes a document library and basic lists such as Announcements, Calendar, Contacts, and Links.
- Blank site Select this site template when you want to create a site with a blank home page that you plan to customize. You can use a Web design program that is compatible with Windows SharePoint Services, such as Microsoft Office SharePoint Designer 2007, to add interactive lists or any other features.
- Document Workspace site Select this site template when you want to create a site that helps your team members to work together on documents. This template provides a document library for storing the primary document and supporting files, a Tasks list for assigning to-do items, and a Links list for resources related to the document.
- Wiki site Select this site template when you want to create a site where users can quickly and easily add, edit, and link Web pages.
- Blog site Select this site template when you want to create a site where users can post information and allow others to comment on it.
- Basic Meeting Workspace site Select this site template when you want to create a site that helps you to plan, organize, and track your meeting with the rest of your team. The template includes following lists: Objectives, Attendees, Agenda, and Document Library.
- Blank Meeting Workspace site Select this site template when you want to create a blank Meeting Workspace site that you can customize, based on your requirements.
- Decision Meeting Workspace site Select this site template when you want to create a site that is ideal for reviewing documents and recording any decisions that are reached at the meeting. The template includes the following lists: Objectives, Attendees, Agenda, Document Library, Tasks, and Decisions.
- Social Meeting Workspace site Select this site template when you want to create a site that helps you to plan and coordinate social occasions. The template includes the following lists: Attendees, Directions, Things To Bring, Discussions, and Picture Library.
- Multipage Meeting Workspace site Select this site template when you want to create a site that provides all the basics to plan, organize, and track your meeting with multiple pages. The template contains the following lists: Objectives, Attendees, and Agenda in addition to two blank pages for you to customize based on your requirements.
- Click Create.
The Set Up Groups for this Site page appears, where you can set up groups for the site.
- In each section of the Set Up Groups for this Site page, accept the automatically created name for the new SharePoint group, or type a new name, and then add the people or groups whom you want. Click the check mark icon
to verify any names that you type, or click the Address Book icon to browse through your directory for more names.
- Click OK.
Top of PageOther ways to create sites
There are other ways to create sites, if you are an administrator or a developer or if you have a Web design program that is compatible with Windows SharePoint Services.
- Create sites in SharePoint Central Administration If you are a server administrator, you can create site collections by using SharePoint Central Administration. For more information, see Central Administration Help and the Windows SharePoint Services Planning Guide.
- Create sites by using a command-line operation If you are an administrator, you can create sites by using the createsites command and parameters. For more information, see Central Administration Help and the Windows SharePoint Services Planning Guide.
- Create sites programmatically If you are a developer, you can create and customize sites programmatically. For more information, see the Microsoft Windows SharePoint Services Developer Center.
- Create sites with a compatible Web design program If you have a Web design program that is compatible with Windows SharePoint Services, you can create and customize sites by using the Web design program. For more information, see Help in the program.
Top of Page