The Three-state workflow is designed to track the status of a list item through three states (phases). It can be used to manage business processes that require organizations to track a high volume of issues or items, such as customer support issues, sales leads, or project tasks.
In this article
 How does the Three-state workflow work?
Set up a list to use a Three-state workflow
Add a Three-state workflow to a list
Start a Three-state workflow on an item
Complete a workflow task in a Three-state workflow
How does the Three-state workflow work?
The Three-state workflow supports business processes that require organizations to track the status of an issue or item through three different states and two transitions between the states. With each transition between states, the workflow assigns a task to a person and sends that person an e-mail alert
about the task. When this task is completed, the workflow updates the status of the item and progresses to the next state. The Three-state workflow is designed to work with the
Issue Tracking list template, but it can be used with any list that is set up to contain a Choice
column with three or more values. The values in this
Choice column serve as the states that the workflow tracks.
The
Three-state workflow can be used to manage business processes that require organizations to track a high volume of issues or items, such as customer support issues, sales leads, or project tasks. For example, the employees at a small event planning company can use an issue-tracking list and a customized Three-state workflow to manage the numerous tasks related to events that they are planning. The Three-state workflow tracks the event-planning tasks through three states:
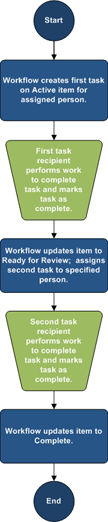
Active, Ready for Review, and Complete. All of the event preparation tasks related to a specific event are compiled into an issue-tracking list that was created for that event and marked as Active. The event coordinator assigns individual tasks to her team members and then starts the Three-state workflow on these items to initiate work on the event task.
When the workflow starts, it creates a task for the designated person. When a team member receives a task, he or she performs the work required to complete the task. This may be work that takes place outside of the list or site where the issue-tracking list is located. For example, if a team member receives a workflow task to develop a catering plan, he or she contacts a catering company and then works with them
to develop a plan. When the catering plan is drafted, the team member marks his or her workflow task as complete. At this point, the workflow updates the status of the event task in the issue-tracking list from Active to Ready for Review, and it creates a second task for the event coordinator to review the catering plan. After the event coordinator reviews and approves the catering plan, she marks her workflow task as complete, and the workflow updates the status of the task from Ready for Review to Complete.
Note
A workflow participant can complete a workflow task in a Three-state workflow in two different ways. A participant can edit the workflow task to mark it as complete, or a participant can change the status of the workflow item in the list (if the participant has permission to change this list). If a participant manually updates the status of the workflow item in the list, the workflow task is completed. If the participant edits the workflow task to mark it as complete, the status of the workflow item in the list is updated to Complete.
The actions in the Three-state workflow in this example follow this process:
 Top of Page
Set up a list to use with a Three-state workflow
Before you can use a Three-state workflow, you must set up a list to use in conjunction with the workflow. This list must contain the items that you plan to track or manage by using the workflow. The Issue Tracking list template is designed to work with the Three-state workflow, but you can also create a custom list to use with these workflows. If you create a custom list to use with the
Three-state workflow, you must ensure that the list contains at least one Choice column that includes three or more choice values. When you set up a three-state workflow for use with the list, you must specify the Choice column that contains the state values that the workflow will track.
Create an issue-tracking list for use with a Three-state workflow
By default, you can use a Three-state workflow with any list that you create from the Issue Tracking list template.
- Click View All Site Content, and then click Create on the All Site Content page.
Tip In most cases, you can use the Site Actions menu  instead to complete this step.
- Under Tracking, click Issue Tracking.
- In the Name box, type a name for the list. The list name is required.
The name appears at the top of the list page, becomes part of the Web address for the list page, and appears in navigational elements that help users to find and open the list.
- In the Description box, type a description of the purpose of the list. The description is optional.
- To add a link to this list on the Quick Launch, click Yes in the Navigation section.
- Click Create.
Create a custom list for use with a Three-state workflow
If you want to create a custom list for use with a Three-state workflow, you must add at least one Choice column that contains the state values that the workflow will track.
- Click View All Site Content, and then click Create on the All Site Content page.
Tip In most cases, you can use the Site Actions menu instead to complete this step.
- Under Custom Lists, click Custom List.
- In the Name box, type a name for the list. The list name is required.
The name appears at the top of the list page, becomes part of the Web address for the list page, and appears in navigational elements that help users to find and open the list.
- In the Description box, type a description of the purpose of the list. The description is optional.
- To add a link to this list on the Quick Launch, click Yes in the Navigation section.
- Click Create.
Customize a custom list for use with a Three-state workflow
- If the list is not already open, click its name on the Quick Launch.
If the name of your list does not appear, click View All Site Content, and then click the name of your list.
- On the Settings menu
 , click List Settings.
 - Under Columns, click Create Column.
- In the Name and Type section, under Column name, type the name of column that you want to use to specify the state values for the workflow.
- Under The type of information in this column is, select
Choice (menu to choose from).
- In the Additional Column Settings section, under Description, type an optional description for the column.
- Under Require that this column contains information, click Yes.
- In the list box under Type each choice on a separate line, type three or more choice values that you want for this column.
These values will become the states for the workflow.
- Under Display choices using, select either Drop-Down Menu or Radio Buttons.
- Under Allow 'Fill-in' choices, click No.
- Specify whether you want a specific default value for this column or if you want to add it to the default view for the list.
- Click OK.
Top of PageAdd a Three-state workflow to a list
You must add a Three-state workflow to a list before you can use it on items in that list. When you add a Three-state workflow to a list, you specify which column in the list contains the state values that you want the workflow to track. You also specify information about what you want to happen at each stage of the workflow. For example, you can specify the individuals to whom tasks should be assigned and the details of the e-mail alerts that task recipients receive.
You must have the Manage Lists permission to add a workflow to a list.
- Open the list to which you want to add a Three-state workflow.
- On the Settings menu , click List Settings, or click the settings for the type of library that you are opening.
For example, in a document library, click Document Library Settings.
- Under Permissions and Management, click Workflow settings.
Note
If workflows were already added to this list, library, or content type, this step takes you directly to the Change Workflow Settings page, and you need to
click Add a workflow to go to the Add a Workflow page. If no workflows were already added to this list, library, or content type, this step takes you directly to the Add a Workflow page.
- On the Change Workflow Settings page, click Add a workflow.
- On the Add a Workflow page, in the Workflow section, click Three-state under Select a workflow template.
- In the Name section, type a unique name for the workflow.
- In the Task List section, specify a task list to use with the workflow.
Notes
- You can use the default Tasks list or you can create a new one. If you use the default Tasks list, workflow participants will be able to find and view their workflow tasks easily by using the My Tasks view of the Tasks list.
- Create a new tasks list if the tasks for this workflow will reveal sensitive or confidential data that you want to keep separate from the general Tasks list.
- Create a new tasks list if your organization will have numerous workflows or if workflows will involve numerous tasks. In this case, you might want to create tasks lists for each workflow.
- In the History List section, select a history list to use with this workflow. The history list displays all of the events that occur during each instance of the workflow.
Note
You can use the default History list or you can create a new one. If your organization will have numerous workflows, you might want to create a separate history list for each workflow.
- In the Start Options section, do either of the following:
- If you want to allow the workflow to be started manually, select the Allow this workflow to be manually started by an authenticated user with Edit Items Permissions check box. Select the Require Manage Lists Permissions to start the workflow check box if you want to require additional permissions to start the workflow.
- If you want the workflow to start automatically when new items are created, select the Start this workflow when a new item is created check box.
- Click Next.
- In the Workflow states section, under Select a 'Choice' field, select the Choice column from the list that contains the values that you want to use for the states in your workflow, and then select the column values that you want for the Initial state, Middle state, and Final state of the workflow.
- In the two sections Specify what you want to happen when a workflow is initiated (options for the first task in the workflow) and Specify what you want to happen when a workflow changes to its middle state (options for the second task in the workflow)
specify the following information:
Task Details
| Task Title: | Type any information that you want to include in the in the task title. If you select the Include list field check box, the Title information for the list item is added to the custom message. |
| Task Description: | Type any information that you want to include in the description of the task. If you select the Include list field check box, the Title information for the list item is added to the custom message. If you select the Insert link to List item check box, a link to the list item is included in the description. |
| Task Due Date: | If you want to specify a due date for the task, select the Include list field check box, and then select the date column from the list that contains the due date information that you want to use. |
| Task Assigned To: | To assign the task to a person who is specified in the list, click Include list field, and then select the column from the list that contains the user information that you want to use. When this workflow is started, the first task is assigned to the person whose name appears in this column for the workflow item. To assign this task in all instances of this workflow to a person or group you specify, click Custom, and then type or select the name of the person or group to whom you want to assign the task. |
E-mail Message Details
Select the Send e-mail message check box if you want the workflow participants to receive e-mail alerts about their workflow tasks.
Note
If you want to ensure that workflow participants receive e-mail alerts and reminders about their workflow tasks after workflows are started, check with your server administrator to verify that e-mail
is enabled for your site.
| To | Type the name of the person to whom you want an e-mail alert about the workflow task to be sent. Select the Include Task Assigned To check box if you want to send the e-mail alert to the task owner. |
| Subject | Type the subject line that you want to use for the e-mail alert. Select the Use Task Title check box if you want to add the Task title to the subject line of the e-mail message. |
| Body | Type the information that you want to appear in the message body of the e-mail alert. Select the Insert link to List item check box if you want to include a link to the list item in the message. |
- Click OK.
Top of PageStart a Three-state workflow on an item
A Three-state workflow first must be added to a list to make it available for use on items in that list.
A Three-state workflow can be configured to start automatically when new items are added to a list, or it can be configured to allow users with specific permissions to start the workflow manually. Some workflows may allow both options. To manually start a Three-state workflow on a list item, you must have Edit Items permission for the list. Some workflows may require that you have the Manage Lists permission.
Note
If you want to ensure that workflow participants receive e-mail alerts and reminders about their workflow tasks after you start a workflow, check with your server administrator to verify that e-mail is enabled for your site.
- Open the list that contains the item on which you want to start a Three-state workflow.
- Point to the item on which you want to start a workflow, click the arrow that appears, and then click Workflows.
Note
The Workflows command is available only when the item is in a list or library that has at least one workflow associated with it.
- Under Start a New Workflow, click the name of the Three-state workflow that you want to start.
The workflow starts immediately.
Top of PageComplete a workflow task in a Three-state workflow
To complete a workflow task in a Three-state workflow you must have at least the Edit Items permission for the tasks lists where the workflow tasks are recorded.
- Open the Tasks list for the site, and then select My Tasks on the View menu to locate your workflow task.
Note
If the workflow does not use the default Tasks list, your workflow task may not appear in the Tasks list. To locate your workflow task, go to the list or library where the workflow item is saved. Point to the name of the task that you want to complete, click the arrow that appears, and then click Workflows. On the Workflow Status page, under Running Workflows, click the name of the workflow in which you are a participant. Under Tasks, locate your workflow task.
- Point to the name of the task that you want to complete, click the arrow that appears, and then click Edit Item.
- In the form that appears, type or select the information that is requested to complete the task.
Top of Page