You can use a calendar to store team events, including meetings, social events, and all-day events. You can also track team milestones, such as deadlines or product release dates, that are not specific to a time interval.
In this article
 Overview
Customize the default calendar
Create a new calendar
Add an event from a site
Add an event by sending e-mail
Overview
Microsoft Windows SharePoint Services 3.0 comes with a default calendar that you can customize and update. You can create additional calendars if you need them.
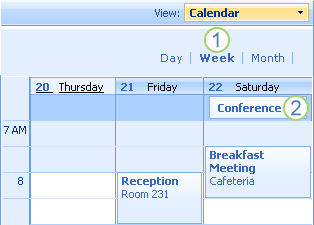
 Calendars have different views.
 All-day events appear at the top of a calendar according to date; other events appear according to date and time.
You can add events to a calendar on a
Microsoft Windows SharePoint Services 3.0 site, or even add meeting requests and attachments to a calendar by sending e-mail messages. If you use a calendar program that is compatible with Windows SharePoint Services 3.0, such as Microsoft Office Outlook 2007, you can view and update the calendar on your site from your calendar program.
Calendars help you manage and view your schedule by day, week, and month. You can make any of these views your default view for the site, or you can create custom views. You can navigate forward and back within the view, for example, to see the next month.
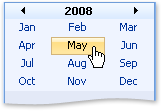
You can also use a grid to easily browse your calendar. For example, if you are viewing a conference event in May 2008 and then want to view a possible date for the following year's conference, you can quickly browse to May 2009.
You can manage the process for updating your calendar just as you manage
the updates to any list. You can require approval for items that are submitted to a calendar and manage which groups of people can see events before they are approved. You can also track versions of calendar items, so you can see what has changed and restore previous versions.
 Top of Page
Customize the default calendar
A calendar is created for you when Windows SharePoint Services 3.0 creates a new site. If you don't want to customize the calendar, you and your team can start adding events to it by following the steps later in this article. You can also customize the calendar by changing its name or other settings.
To do this, you must have permission to change the design of the lists on your site.
- On the
Quick Launch, click Calendar.
If Calendar
does not appear, click View All Site Content, and then click Calendar.
- To change the settings for this calendar, on the Settings menu
 , click List Settings.
 - To change the title and description, under General Settings, click Title, description and navigation, and then type a different title and description.
- Change any other settings that you want, and then click Save.
- Return to your calendar by clicking its name in the Top Navigation bar.
Top of PageCreate a new calendar
- Click View All Site Content, and then click Create on the All Site Content page.
Tip In most cases, you can use the Site Actions menu  instead to complete this step.
- Under Tracking, click Calendar.
- In the Name box, type a name for the calendar. The calendar name is
required.
The name appears at the top of the calendar page, becomes part of the Web address for the calendar page, and appears in navigational elements that help the user to find and open the calendar.
- In the Description box, type a description of the purpose
of the calendar. The description is optional.
The description appears at the top of the calendar page in most views, underneath the name of the calendar. If you plan to enable the
list to receive content by e-mail, you can add the e-mail address of the calendar to its description, so that people can easily find the
e-mail address.
- To add a link to the calendar on the Quick Launch, click Yes
in the Navigation section.
- If an E-mail section is available on the New page, your administrator has enabled your site to receive content by e-mail. If you want people to add events to the calendar by sending e-mail, click Yes. Then, in the E-mail address box, type the first part of the address that you want people to use for the calendar.
- Click Create.
Top of PageAdd an event from a site
Follow this procedure to add an event to a calendar that you are viewing on a SharePoint site.
- If the calendar is not already open, click its name on the Quick Launch.
If the name of your calendar does not appear, click View All Site Content, and then click the name of the calendar.
- On the New menu
 , click New Item.
 - To make the item an all-day event, so that it doesn't appear at a specific time slot on a calendar, select the Make this an all-day activity that doesn't start or end at a specific hour check box in the All Day Event section.
- To make the event repeat, for example at 11:00 every Wednesday, select the Make this a repeating event check box in the Recurrence section.
- Enter any other information that you want, and then click OK.
Tip You can create a Meeting Workspace site (Meeting Workspace site: A Web site based on a Meeting Workspace site template that is used for planning, posting, and working together on meeting materials, and following up after a meeting or series of meetings.) when you create an event. Find links to more information about Meeting Workspace sites in the See Also section.
Top of PageAdd an event by sending e-mail
Calendars can be set up so that people can add items by sending e-mail, if your site is enabled to receive content by e-mail. You can send calendar items from calendar or e-mail programs that support the iCalendar format.
Before you can send e-mail to a calendar, you need to know whether the calendar is set up to receive e-mail, and then obtain the address.
- Do one or more of the following to obtain the e-mail address for the calendar:
- Look in the address book of your e-mail program. If the e-mail address is not there, you need to obtain it from the person who set up the calendar. Then you can add it to the contacts list of your e-mail program, so that you can easily find it later.
- View the description of your calendar, which appears just under the title of the calendar. Your site owner may have added the e-mail address of the calendar to its description.
- View the e-mail settings for the list, if the e-mail address of the calendar does
not appear in the description and if you have permission to view calendar settings:
- If the list is not already open, click its name on the Quick Launch.
If the name of your list does not appear, click View All Site Content, and then click the name of your list.
- On the Settings menu , click List Settings.
- If the calendar is enabled to receive e-mail, its address appears under List Information, next to E-mail Address.
- Use the e-mail address of your SharePoint group to send the
calendar item, such as a meeting request or appointment, in e-mail. Your organization may have its own e-mail list, called a SharePoint group, which enables its members to send mail to each other. The SharePoint group address can contain the address of your calendar, so that when you send a meeting request to members of the group, the items are automatically added to your SharePoint calendar.
- To send a calendar item, send a meeting request or an appointment from your e-mail or calendar program.
Calendars can be set up to also receive attachments to items by e-mail. To include an attachment with your list item, attach the file to your meeting request as you normally do.
- In the To or Cc
box of the meeting request, enter the address of the calendar. If your SharePoint group already includes the calendar, enter the e-mail address of the SharePoint group instead.
- Send the message. In most e-mail applications, you click Send to send the message.
Note
If you send a calendar item to a SharePoint site by using e-mail, you need to let your meeting attendees know if the meeting changes. If you change the meeting details on the SharePoint site, meeting updates and cancellations are not sent automatically from the SharePoint site.
Top of Page